
Working with trade bots on Phemex
In the rapidly growing world of cryptocurrency trading, integration and automation have become more crucial than ever. As traders, understanding how to connect with advanced platforms like TradeServer Cloud is vital to optimize trading strategies and profits. In this guide, we’ll walk you through setting up a Phemex account, funding it, and integrating it with TradeServer Cloud or Enterprise for an enhanced trading experience.
1. Setting up a Phemex account
What are Phemex levels?
Phemex has structured its trading platform to accommodate all types of traders, from novices to professionals. To cater to this diverse user base, they’ve introduced multiple VIP levels, each offering distinct advantages, primarily revolving around trading fees. Here’s a breakdown of these levels:
Standard (Non-KYC)
- Overview: This is the default level for every new user on Phemex. It requires no prerequisites in terms of trading volume or account details.
- Benefits: Standard trading fees apply, with no special reductions.
VIP 1
- Overview: Aimed at those who are starting to establish their trading presence on Phemex.
- Benefits: Users receive a slight reduction in trading fees compared to VIP 0. To attain this level, there’s a stipulated 30-day trading volume requirement.
VIP 2
- Overview: For traders who are more active and have increased their trading volume significantly.
- Benefits: A further reduced trading fee structure is the main advantage. As with all VIP levels, a specified 30-day trading volume must be maintained.
VIP 3
- Overview: This is where professional traders or heavy users might find themselves.
- Benefits: Yet another drop in trading fees is the highlight, rewarding users for their loyalty and trading activity. A substantial 30-day trading volume is the key to unlock this level.
VIP 4
- Overview: Tailored for high-frequency traders and institutions.
- Benefits: VIP 4 users enjoy one of the lowest trading fee structures on Phemex. The 30-day trading volume requirement for this level is understandably higher than the previous tiers.
VIP 5
- Overview: The pinnacle of Phemex’s VIP system, reserved for the elite traders or institutional clients.
- Benefits: The crème de la crème of trading fee reductions is offered at this level. Attaining VIP 5 status is a testament to a trader’s activity, requiring the highest 30-day trading volume amongst all levels.
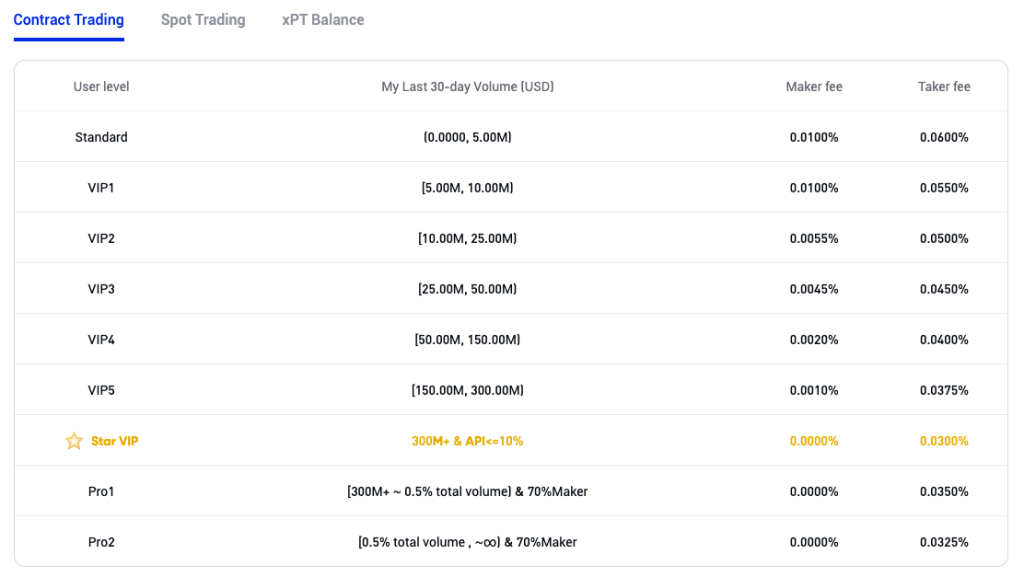

Understanding these VIP levels can help traders strategically plan their trading activity to benefit from reduced fees. Whether you’re just getting started or an established trader, Phemex has a VIP tier tailored to suit your needs. For a more in-depth look into each level’s specifics, including exact fee structures and trading volume requirements, be sure to check out Phemex’s VIP page.
Can I trade without KYC on Phemex?
KYC, which stands for “Know Your Customer,” is a standard verification process adopted by many financial institutions, including cryptocurrency exchanges like Phemex. This process involves verifying the identity of a platform’s users. While Phemex does provide the option for traders to execute trades without undergoing this KYC procedure, there are certain implications and restrictions to be aware of:
Trading without KYC:
- Benefits: Traders can maintain their privacy and start trading more swiftly without the need for identity verification. This could be especially appealing to those who prioritize discretion in their financial transactions.
Implications of not completing KYC:
- Withdrawal Limits: Non-KYC verified users face daily withdrawal limits. This can be a drawback for traders who might need to move larger amounts of crypto assets frequently.
- No Fiat Transactions: Non-KYC users cannot access fiat-to-crypto transactions. This means they can’t directly buy cryptocurrencies using traditional currencies like USD, EUR, etc.
- Limited Access to Financial Products: Some of Phemex’s advanced financial products and features might be restricted to users who haven’t completed their KYC verification.
- Reduced Security: Although Phemex ensures the safety of all its users, completing the KYC process provides an added layer of security. It ensures that the rightful owner can reclaim their account in case of any discrepancies.
Completing the KYC Process: For those who decide to undergo KYC verification on Phemex, the process is straightforward. You’ll be required to provide personal details and identity proofs, such as a government-issued ID. Once submitted, Phemex’s team will review and approve your documents, post which you can enjoy the full suite of features offered by the platform.
While trading without KYC does offer an added layer of privacy, it’s essential to weigh this against the potential limitations, especially if you intend to use the platform extensively. For a detailed breakdown on Phemex’s KYC procedures and the exact limits imposed on non-verified users, you can refer to Phemex’s Help Center on KYC.
2. Depositing & managing your crypto
Unraveling Phemex’s fee structure
When trading on Phemex, it’s essential to have a clear understanding of the platform’s fee structure to ensure you’re making the most out of your trades. Let’s break down the different types of fees you might encounter:
1. Trading Fees:
- Maker Fees: This is the fee applied when you place an order that adds liquidity to the market, i.e., a limit order that doesn’t fill immediately. Phemex charges a maker fee which is usually a percentage of the trade amount. It’s essential to check the current rates, as these fees might differ depending on the specific trading pair or your VIP level.
- Taker Fees: When you place an order that takes liquidity from the market, like a market order that fills immediately, you are charged a taker fee. Again, this is a percentage of the trade amount, and rates might vary based on trading pairs and your VIP level.
2. Deposit Fees: Phemex does not charge any fees for depositing cryptocurrencies. This means you can transfer your assets into your Phemex account without any additional costs. However, it’s always a good idea to double-check this, especially if there are any new updates or changes to the platform’s policy.
3. Withdrawal Fees: Phemex does impose a withdrawal fee to cover the network costs of processing the transaction. These fees might vary depending on the cryptocurrency you’re withdrawing and the current state of that specific blockchain network. It’s worth noting that these fees aren’t a profit mechanism for Phemex but rather a pass-through of the actual network fees.
Other Considerations: While the above fees are the primary ones to be aware of, remember that your overall trading cost might also be influenced by factors like spreads (the difference between the buying and selling price) and potential funding rates (if you’re trading on margin).
In conclusion, while Phemex offers competitive rates, it’s vital to be aware of the fees involved, so there are no surprises. Always ensure you check the latest fee structure on the Phemex’s Fees & Conditions page before executing any trades or withdrawals.
Navigating Phemex’s deposit, withdrawal, and trade limits
Every exchange has specific operational boundaries to ensure the security of its users and maintain the integrity of its platform. Here, we’ll dive into Phemex’s restrictions concerning deposits, withdrawals, and trades.
1. Deposit Limits:
- Minimum Deposit: Phemex does not have a minimum deposit limit for cryptocurrencies. This means traders are free to deposit small amounts. However, it’s crucial to consider that depositing small fractions might not be economical due to potential network fees when moving funds between wallets or exchanges.
- Maximum Deposit: There is no upper cap on how much cryptocurrency you can deposit into your Phemex account, allowing traders to operate with flexibility.
2. Withdrawal Limits:
- Minimum Withdrawal: Phemex enforces a minimum withdrawal amount for each cryptocurrency. This is essential to ensure that the transactions are worth the associated network fees. Before initiating a withdrawal, always check the specific minimum for the cryptocurrency in question.
- Maximum Withdrawal: This can vary based on your account’s verification level. Non-KYC verified accounts might face more stringent withdrawal limits than those that have completed the verification process. Always refer to Phemex’s platform or support for current details.
3. Trade Limits:
- Minimum Trade Size: Trading on Phemex has a minimum order size, which varies depending on the trading pair. This ensures that orders are significant enough to be matched and filled without causing micro-fragmentation in the order book.
- Maximum Trade Size: While there’s no strict maximum trade size, it’s essential to consider the liquidity of the trading pair you’re interested in. Large orders in less liquid markets could lead to significant price slippage.
Other Considerations:
- While Phemex provides flexibility for most traders, always be mindful of the dynamic nature of the crypto world. Exchange limits and policies can change based on market conditions, regulatory requirements, or operational needs.
- KYC (Know Your Customer) procedures can often affect your operational limits on exchanges. Completing these procedures can provide increased limits and functionalities. However, as we previously noted, Phemex does allow non-KYC trading, albeit with some restrictions.
In summary, whether you’re depositing, withdrawing, or executing a trade, being aware of Phemex’s operational boundaries ensures a seamless trading experience. Always consult the Phemex’s Fees & Conditions page for the most current and specific details.
3. Connecting Phemex with HaasOnline
Generating API keys on Phemex
Using API keys is a secure way to connect trading platforms and tools, like TradeServer Cloud or Enterprise, to exchanges without giving full access to your account. Phemex provides an efficient method to generate these keys. Here’s a step-by-step guide on how to do it:
1. Log into your Phemex Account:
- Ensure you are on the official Phemex website to keep your information safe. Always double-check the URL.
2. Navigate to the Account Section:
- Once logged in, head over to the top right corner and click on your profile icon or name. This action will open a dropdown menu.
- From the dropdown, select “API.”
3. Create a New API Key:
- You’ll be directed to the API Management page. Here, click on “Create API.”
- A form will pop up asking for details like API name, IP address (optional), and expiry date (optional).
- API Name: This is for your reference. Naming it something related to the tool you’re connecting (e.g., “TradeServerCloud”) can help you keep track.
- IP Address Whitelisting: This is an optional security feature. By entering specific IP addresses, you ensure that only devices from those addresses can use this API key. If you’re unsure about this or are using multiple IP addresses, you can leave it blank.
- Expiry Date: Setting an expiry date can be a good security measure if you want the key to be active only for a specific duration.
4. Access API Key and Secret:
- Once you click on “Confirm” after filling out the form, your API Key and Secret will be generated. Ensure to copy and save these in a secure location. Remember, the Secret is shown only once; if you lose it, you’ll need to generate a new API pair.
5. Permissions:
- Phemex allows you to set permissions for your API keys. Typically, for trading bots, you’d enable “Order” permissions, allowing the bot to place trades on your behalf. However, most traders prefer to keep the “Withdrawal” permission off for added security.
Security Tip: Never share your API Secret with anyone and avoid using API keys on public or untrusted devices. If you ever suspect that your API key has been compromised, delete it immediately and generate a new one.
By following these steps, you’ve successfully created an API key on Phemex, ready to be integrated with tools like TradeServer Cloud or Enterprise, enhancing your trading capabilities.
For visual guidance, you can also refer to Phemex’s official guide here.
Do I need to enable withdrawal permission?
No. For security reasons, it’s recommended to keep withdrawal permissions disabled when generating API keys for trading bots.
Where do I setup Phemex in TradeServer Cloud?
Once you have your Phemex API keys, login to TradeServer Cloud. Navigate to ‘Exchange Accounts‘, select ‘Add New’, and choose Phemex from the dropdown. Input your API key details, and you’re connected!
You may also just want to setup a simulated Phemex exchange account for use with paper trading. In that case the steps are the same, however select “Simulated Account” and configure your simulated wallet balances.

4. Exploring trade bots with Phemex
Where can I find a list of trade bots to use?
Getting started with trading bots on Phemex is a streamlined experience, especially when you leverage the resources at your disposal. Here are your options:
1. Discover Community-Developed Scripts:
- HaasScripts.com: A treasure trove for traders, HaasScripts is a community-driven platform where experienced traders and developers share their custom trade bot scripts. This resource can be a game-changer, especially if you’re looking for strategies that have been tried and tested by other traders. You can browse, choose, and implement any of these scripts directly into your TradeServer setup.
2. Copy Existing Bots with Templates Explorer:
- Templates Explorer in TradeServer Cloud: If you’re not keen on starting from scratch or delving into custom scripts just yet, the Templates Explorer is your go-to. Located within TradeServer Cloud, this feature offers a range of pre-configured trading bot templates. These templates are designed for various strategies and market conditions, allowing you to select one that aligns with your trading goals. Just pick a template, set it up with your Phemex account, and you’re good to go.
3. Craft Your Custom Trading Bot:
- Harness Your Strategy: If you have a unique trading strategy in mind or want to experiment with various indicators and conditions, creating a custom bot is the way forward. With the tools available in TradeServer Cloud, you can build a trading bot tailored to your specifications. Whether you’re implementing intricate market analysis techniques or basic buy/sell strategies, the platform empowers you to bring your vision to life.
Remember, the world of automated trading offers limitless potential, but it’s essential to stay informed and continually optimize your strategies. Whether you’re leveraging community-driven scripts, using the pre-configured templates, or crafting your masterpiece, ensure you’re aligning with your trading objectives and risk tolerance.
